3D Studio Max Unrobotic Unreal Engine toolset: 6. Export Anims
The Export Anims helper is used to configure and manage animations in your scene to be exported. Each helper provides an animation table that lets you provide a name, start frame and end frame for a collection of animations in a specified selection of objects. Exporting to Unreal Engine is a one click process that provides a single FBX file per animation.
Export Anims properties
As with the Export Node, clicking an Export Anims helper will display its properties in the command panel. Here's a quick look through them:
|
|

The provided scene Exporter - Skeletal Character.max contains an example export setup and shows best practices of combining both Export Node and Export Anims helpers in a character animation file. Let's take a quick look at the file and see how it works:
The structure of the scene
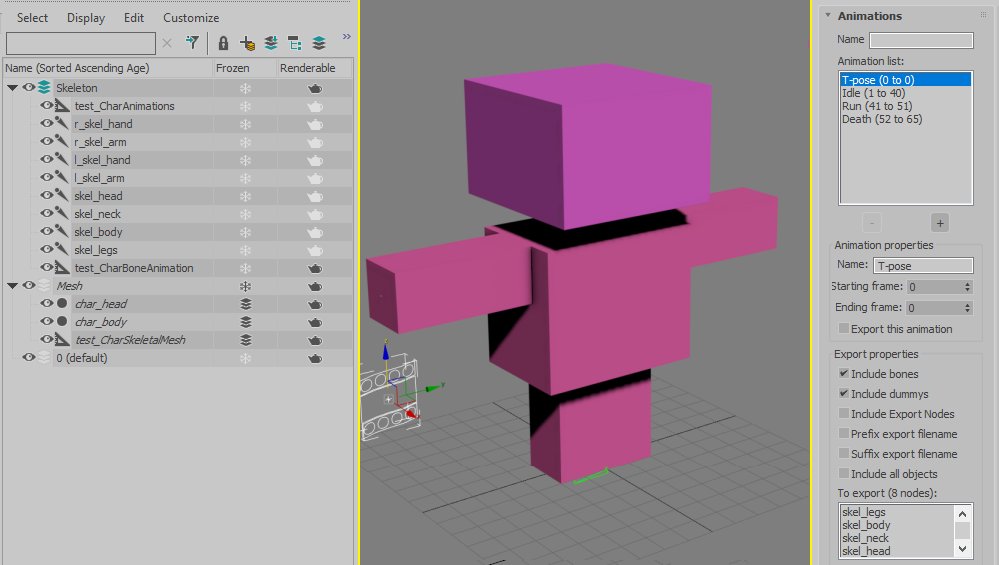
If you take a look on the left, you can see the scene explorer (with Sort by Layer turned on so that we can see the relationship to layers). There are two new layers that have been created:
-
Mesh contains the mesh information related to the character. In this instance, it's two Editable Polygons - one for the head and one for the body. Both objects have a skin modifier which is linked to a skeletal rig. There is also a single Export Node helper (test_CharSkeletalMesh).
- Skeleton contains the bone rig for this character, as well as a second Export Node helper called test_CharBoneAnimation and an Export Anims helper called test_CharAnimations.
The Export Anims helper has four sets of animations defined:
- T-pose ranging from frame 0 to 0. It is disabled (Export this animation unchecked) so that it is not exported,
- Idle ranging from frame 1 to 40 - A looped idle animation,
- Run ranging from frame 41 to 51 - A looped running animation,
- Death ranging from frame 52 to 65 - A death animation,
Note that the animations should end on the same animated frame as they start. For example, Run has the same bone transformations in frame 1 as it does in frame 40. This is how Unreal Engine expects the animation and will ignore the last frame to provide a smooth loop point.
Why are there two Export Nodes?
The first Export Node on the Mesh layer (test_CharSkeletalMesh) is responsible for exporting the Skeletal Mesh into Unreal Engine. If you click it and take a look at its properties in the modifier panel, you can see that Include all objects has been checked, and Ignore bones has been unchecked. This means that when exporting, the layer will be ignored and all meshes and bones will be exported.
The second Export Node on the Skeleton layer (test_charBoneAnimation) only has Ignore bones unchecked. Because it's in the Skeleton layer, only the objects in this same layer will be exported - in this case the animated skeleton. However, if you look closely at the scene layout you'll see that it has its renderable property set to false. That means that this Export Node will never be exported.
The key to this working is the final Export Anims helper (test_CharAnimations). If you click it and have a look at the properties you'll find that it has been set to ignore bones and dummies and use Export Nodes as its source of objects. Because we have the test_charBoneAnimation helper on the same layer as this Export Anims object, it will use the objects that make up part of that Exporter.
Exporting the skeletal mesh
The skeletal character mesh is exported using the usual Export Node process. For this example you would click test_CharSkeletalMesh in the Mesh layer and use the Export FBX option. This will export both the skeletal rig and the polygon mesh to an FBX which Unreal Engine can then read.
Exporting the animations
The Export Anims helper called test_charAnimations is used to export the animations defined. In this example it's as easy as selecting the test_charAnimations helper and clicking the Export FBX button in the modifiers panel. As with Export Nodes, you'll be asked for a destination path. This destination path is stored in the max file (and shared with Export Nodes in the same scene). The file name you pick is ignored (unless you turn on the prefix/suffix options) and the Export Anims name is used as a suffix. The main part of the export filename is the animation name from the table.
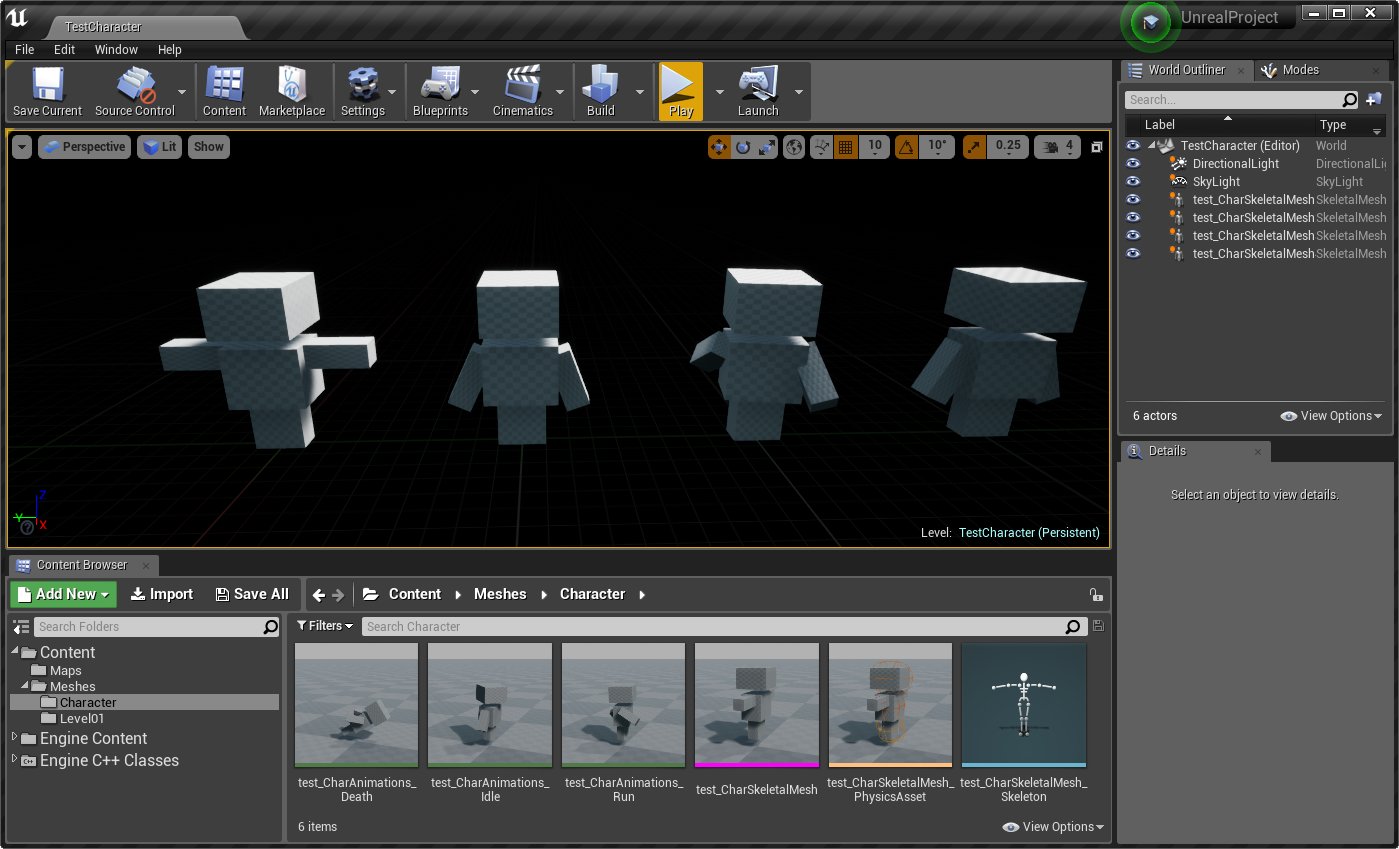
In the example scene you can see that we have four animations configured. T-pose, Idle, Run and Death. T-pose has been set so that it doesn't export (it is of no use to use in UE4 as it's included in the exported mesh). When you click Export FBX and select the place to export to, the helper will create three FBX, one for each animation.
- test_CharAnimations_Idle.fbx
- test_CharAnimations_Run.fbx
- test_CharAnimations_Death.fbx
These FBX can then be simply imported into Unreal Engine and pointed at your exported character's skeleton. Note that any active (renderable) Anim Export nodes will also be exported in the scene when using the Export all (or selected) script utility. Exporting will be done after any Export Nodes in the scene so that your skeleton will exist in Unreal Engine, ready to link to the animations.
A level has been provided in the example Unreal Engine project that shows the exported results in action.
Best practices with skeletal animation exporting
Because skeletal models can be so complicated there are a few things to keep in mind when configuring your scene and exporting:
-
Always try to keep the Export Node at 0.0, 0.0, 0.0
The Export Node helper will try to compensate when it finds an export helper that is not at the world's origin. 90% of the time this should work fine for example objects and meshes. However, it can run into problems if you have IK or constraints location-specific animation. For complex characters or rigs it's recommended to keep any Export Nodes that will be used for characters at the very center, 0,0,0, of your scene.
While the ideal workflow is one character per max scene, you can still include multiple characters by using different layers. You'll have to adjust the workflow slightly, though (for example, putting the mesh and rig on the same layer).
-
Exporting animations uses max fetch/hold trickery
To export the FBXs correctly for each animation in the table, the toolset is exporting/importing animation data in the background. To ensure that your scene is restored to how it was when first running the export the fetch and hold features are used. Keep this in mind when exporting animations. It's best to save your scene before running the export tool. Any existing held scene will be overwritten.
| ← 5. UE4 Object | 7. Utility scripts → |
3D Studio Max Unrobotic Unreal Engine toolset
Part of the '3D Studio Max Unrobotic Unreal Engine toolset' series.
A release of the internal tools that I've developed over the years for working with Unreal Engine and 3D Studio Max
Who I am
I'm Blake and I like to tinker with things and make stuff. When I'm not programming or developing random systems, I'm playing with electronics, doodling bits of art, 3D modelling or sculpting and painting things or nerding out watching sci-fi or horror TV.
From 2001 I worked in the games industry, eventually specialising in tools to aid in the development of video games and their engines. In 2011 I left the industry and teamed up with a few other talented composers to utilise my knowledge to help build the company 'Spitfire Audio'.
I also periodically compose soundtracks for video-games and have worked on titles such as The Stanley Parable and Portal Knights. You've probably also heard my music in random TV commercials at some point.
What I'm using to make games
Nowadays I tend to utilise Unreal Engine 5. I use a mixture of (mostly) C++ (Visual Studio 2019, Rider) and Blueprints.
I work with Autodesk's 3D Studio Max to generate the art required, and Adobe Photoshop or Paintshop Pro 6 for texturing. I also dabble with Allegorithmic's Substance Designer/Painter for more realistic texturing work.
I tend to generate tools in Python, C++ or NodeJS depending on what's needed.
Audio-wise, I still use Cool Edit Pro and FL Studio to generate sounds and music respectively.