3D Studio Max Unrobotic Unreal Engine toolset: 3. The Export Node
The Export Node is a helper that lets you quickly collect objects in your scene together and determine how they are exported to the Unreal Engine. The tool can be found in the command panel's Create -> Helpers tab, under the category Unrobotic. It's the button called 'Export Node'. To add an Export Node to the scene, simply click the button in the command panel and then click in your scene.
Collecting objects together
The Export Node can work in two ways:
-
Using Max's scene layers
Scene objects are collected and organised via 3D Studio Max's layer functionality. When an Export Node is played on a layer, all other objects in the same layer will be determined as being part of this exportable object. This method can be useful when you have a complex collection of meshes that are not necessarily hierarchically linked (eg. a house with four walls, a roof and a door), -
Using link hierarchy
Object linking is used to determine what is considered part of the exportable object. Any objects linked to the Exporter node (and any children of said node) are determined as being part of the exportable object. This method is useful when you have a more hierarchical layout to the object you're exporting (eg. furniture with items on them).
The Export Node will work out which method you're using based on whether it has any linked objects. You can mix and match both methods in a scene (though I'd recommend a consistent approach purely to maintain sanity on a project with tons of assets). The Export Node will behave as an anchoring 'origin' point for the exported objects. Everything will be translated, scaled and rotated so that the Export Node is at [0,0,0, facing forwards at 1x scale.
Because the Export Node can determine specifically which object it's required to export, it's easy to combine a collection of assets into a single Max scene to easily maintain and export meshes. You can, however, work on the concept of a single UE4 'mesh' per Max scene. There are utilities to batch-export a collection of Max files, and you'll still get the benefits of quick and easy exporting, origin point determination, etc.
An example scene
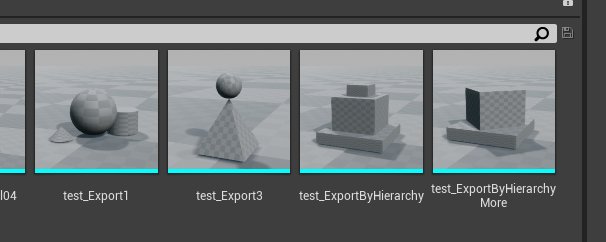
Let's take a look at one of the scenes included in the collection of examples, Exporter - Mixed.max:
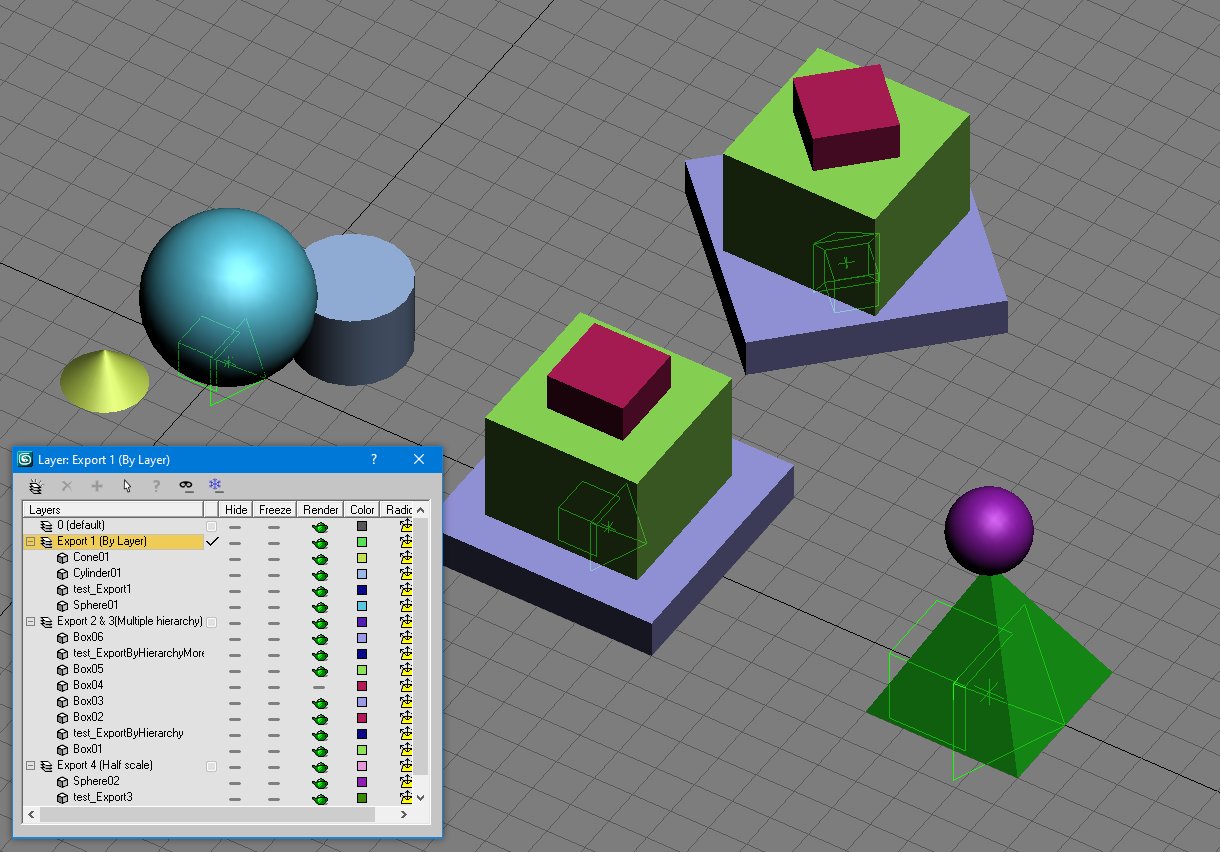
This scene above contains four Export Nodes (the green wireframe arrow). Each Export Node will output a single FBX object. By object I'm meaning something that Unreal Engine would consider as a single 'asset' or static mesh. When exporting this scene, four FBX will be placed in the destination folder:
- test_Export1.fbx containing everything in the layer called Export 1 (By Layer),
- test_ExportByHierarchy.fbx containing Box01, Box02 and Box03 (Box01 is linked to the export node),
- test_ExportByHierarchyMore.fbx containing Box05 and Box06 (Box04 is linked to the export node but set to non-renderable) rotated 45 degrees clockwise,
- test_Export3.fbx containing everything in the layer called Export 4 (Half scale) at 50% size.
|
|
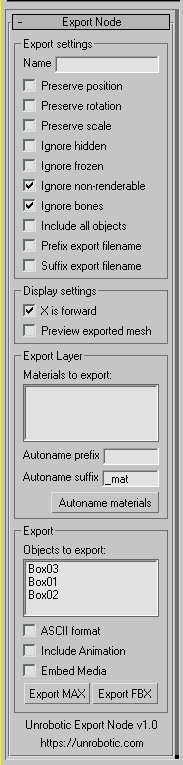
The Export Node properties
|
If you click one of the Export Node helpers you'll see a list of properties in the command panel. Let's have a quick run through the main ones:
|
 |
Exporting multiple nodes
While the command panel above allows you to export the selected Export Node, a much more useful feature is the ability to export the entire scene and each of its Export Node helpers. You can use the included utility macro called 'Export all (or selected) Export Nodes in the scene'. This macro is found in the Customize User Interface dialog and is found under the Unreal Engine 4 category. It can be mapped to your toolbar, menu or keyboard shortcuts as you see fit.
When run, the Export all (or selected) macro will show a File Save As dialog and ask you to specify the destination path and filename. A few things to note here:
- If no nodes are selected when the macro was run all Export Nodes in the scene are exported, one by one. If Export Nodes (or any of the objects they export) are selected when the macro is run, only those selected Export Nodes will be exported. This allows you to select exact groups of node to export,
- Any Export Node that is set to non-renderable (in object properties, or in the layer manager) will not be exported. This allows you to control which objects you permanently want to prevent from exporting,
- The Export Node will remember the file location that you export to per-scene and automatically fill it in next time you export. This location is remembered relative to the max scene file (so sharing between machines will remember correct export locations as long as your source asses and Unreal Project are on the same drive),
- The filename is not necessarily the name of the FBX that will be exported. If the Export Node has either of the 'Prefix / Suffix export filename' options turned on, the filename you submit here will be used. For example, if you export as 'doop.fbx', an object called test_Export1 would be exported as doop_test_Export1.fbx or test_Export1_doop.fbx depending on the options turned on.
Once a file name and path are specified the Export Nodes will be processed and an Unreal-compatible FBX will be created. Personally, I tend to export straight into the Unreal Engine Content folder so that UE4 picks up the asset and imports it automatically. Exporting straight into the Content folder also means that it's very easy to update the exported meshes later on without having to manually re-import in UE4.
Skeletal meshes and characters
The Export Node also works with skeletal-animated meshes. There is an included sample scene Exporter - Skeletal Character.max showing a simplified version of the typical kind of workflow that I use. Note that there are some important things to remember when it comes to exporting bones. Skeletal animation and exporting is covered in depth in the Export Anims section of this documentation.
| ← 2. An Overview | 4. UE4 World → |
3D Studio Max Unrobotic Unreal Engine toolset
Part of the '3D Studio Max Unrobotic Unreal Engine toolset' series.
A release of the internal tools that I've developed over the years for working with Unreal Engine and 3D Studio Max
Who I am
I'm Blake and I like to tinker with things and make stuff. When I'm not programming or developing random systems, I'm playing with electronics, doodling bits of art, 3D modelling or sculpting and painting things or nerding out watching sci-fi or horror TV.
From 2001 I worked in the games industry, eventually specialising in tools to aid in the development of video games and their engines. In 2011 I left the industry and teamed up with a few other talented composers to utilise my knowledge to help build the company 'Spitfire Audio'.
I also periodically compose soundtracks for video-games and have worked on titles such as The Stanley Parable and Portal Knights. You've probably also heard my music in random TV commercials at some point.
What I'm using to make games
Nowadays I tend to utilise Unreal Engine 5. I use a mixture of (mostly) C++ (Visual Studio 2019, Rider) and Blueprints.
I work with Autodesk's 3D Studio Max to generate the art required, and Adobe Photoshop or Paintshop Pro 6 for texturing. I also dabble with Allegorithmic's Substance Designer/Painter for more realistic texturing work.
I tend to generate tools in Python, C++ or NodeJS depending on what's needed.
Audio-wise, I still use Cool Edit Pro and FL Studio to generate sounds and music respectively.